Apartment Sourdough Starter Without Discard: A Micro-Baker’s Guide
You do not need a giant jar, a flour-hungry feeding routine, or a sink full of sourdough discard to bake good bread at home. Keep a tiny, established starter, feed only what you need, and build a larger levain when baking day arrives.
Can you keep a sourdough starter without discarding any? Yes—provided you manage the quantity. The practical trick is to maintain a very small “mother” starter and use the extra ripe starter in your dough rather than tipping it away. For a micro-baker, this means producing only the amount needed for a bake plus a small amount to keep for the next feeding.
Why a small sourdough starter is ideal for an apartment
A conventional starter can become surprisingly large when you feed it regularly but bake only once in a while. A small starter reduces the flour needed for maintenance, takes up less refrigerator space, and is easier to keep in a compact kitchen.
Less flour used
Feeding a 10 g seed uses far less flour than maintaining a large jar. Your routine is sized around the amount you actually bake.
Less counter clutter
A small, straight-sided jar fits in a refrigerator door shelf or a kitchen cabinet when it is not fermenting on the counter.
Less routine waste
Instead of removing starter just to make room, you plan the build so the ripe starter goes into bread and a small seed remains.
Easy to scale
Build a larger levain for a weekend batch without keeping that larger quantity all week.
Small-starter maintenance is an established approach: King Arthur Baking publishes a smaller-starter method designed to reduce the amount of starter maintained and the discard generated. Their guidance also notes that a scale is especially useful when handling small quantities. See the smaller starter method.
The no-discard sourdough starter method
This method is for an established, active starter that reliably rises after feeding. It is not a shortcut for a brand-new starter that is still developing. Use a digital scale because a few grams make a meaningful difference in a tiny culture.
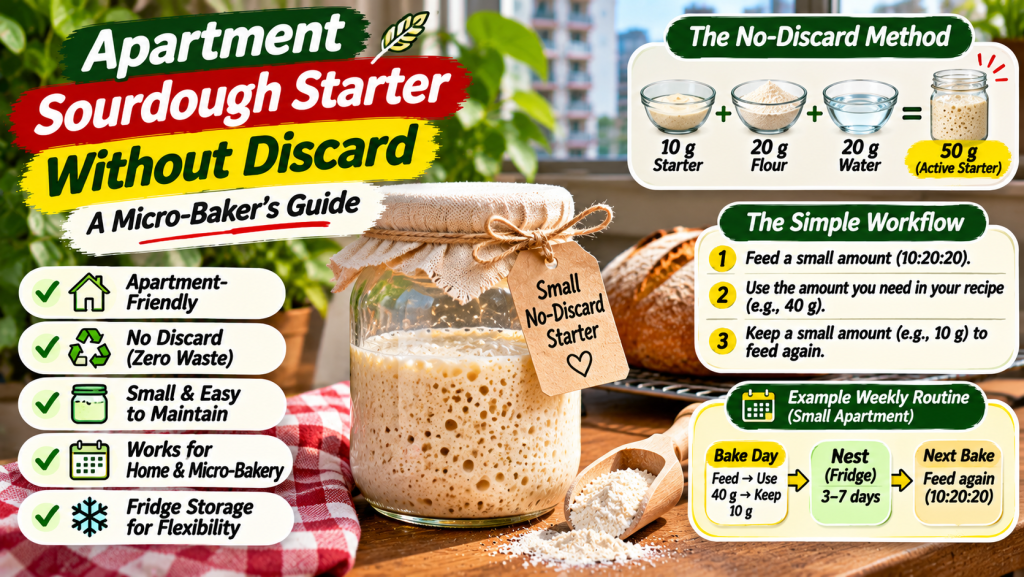
A 10 g starter becomes a 50 g bake-day starter
All quantities are by weight. Rise time varies with starter strength, flour and room temperature.
Keep only a small seed
After your starter is ripe and ready to refresh, retain 10 g in a clean, small jar. The seed is your living culture—not waste. If your current starter is much larger, reduce the amount gradually over a few feedings rather than trying to change every variable at once.
Feed at 1:2:2 by weight
Add 20 g water and 20 g flour to the 10 g seed. Mix thoroughly, scrape down the sides, mark the starting level with an elastic band, and cover loosely so fermentation gas can escape. This produces about 50 g starter.
Use the ripe starter; keep the seed
When the starter has risen and is aerated at the stage your recipe calls for, weigh 40 g into your dough and leave 10 g in the jar. The retained amount becomes the seed for your next feeding. Adjust the flour and water in your bread formula to account for the starter you add.
A micro-baker workflow: build only what the order needs
If you bake a few loaves at a time in an apartment kitchen, keep the mother starter small and make a separate levain build before mixing the dough. This avoids keeping a large tub of starter in the refrigerator all week.
Example: build 210 g of ripe starter
Suppose your dough needs 200 g ripe starter and you want to retain 10 g for the next cycle. You need a total build of 210 g. One possible build is approximately:
| Ingredient | Amount | Purpose |
|---|---|---|
| Active mother starter | 19 g | Inoculates the build |
| Water | 95.5 g | Hydration |
| Flour | 95.5 g | Fresh food for the culture |
| Total | 210 g | 200 g for dough + 10 g retained |
This is approximately a 1:5:5 feeding ratio by weight. It is a planning example, not a fixed timetable: a larger feed ratio usually takes longer to mature than a smaller one, and temperature changes the timing. Use the starter when it is ripe for your recipe rather than relying on the clock alone.
Interactive starter build calculator
Enter the amount of ripe starter your recipe needs, how much you want to retain, and your feed ratio. The calculator estimates the seed, flour and water needed for the build.
Seed starter: 19.1 g
Flour: 95.5 g
Water: 95.5 g
Total: 210 g
This is a baker’s-math estimate. Round to the nearest 0.5–1 g according to your scale, and allow for small losses on the jar and spatula.
Apartment feeding schedules: counter vs refrigerator
Your schedule depends on how often you bake and how warm your kitchen is. A warm apartment can make a starter rise and fall faster than a cool kitchen. Watch its rise, smell and texture instead of treating an exact number of hours as a guarantee.
| Routine | Good fit for | Practical approach |
|---|---|---|
| Room temperature | Baking most days | Feed regularly—often once or twice daily depending on temperature and ratio. Keep the jar small and use the ripe starter in dough. |
| Refrigerated | Baking once a week or less | Keep a small seed chilled between bakes; refresh it regularly (many baking guides suggest weekly maintenance), then give it room-temperature feedings/builds before baking. |
| Pre-bake build | One or more scheduled batches | Take a measured amount of mother starter and build only the amount required for the recipe plus the retained seed. |
King Arthur Baking describes room-temperature feeding as a frequent routine and refrigerated maintenance as a less frequent option, often weekly. Colorado State University Extension also recommends refrigerating an established starter between uses and feeding it regularly. Your starter’s actual readiness will depend on conditions. King Arthur: maintaining a starter · Colorado State University Extension.
Jar, space and smell control in a small kitchen
- Choose a small, wide-mouth jar. A 250–500 ml jar is usually more convenient for a tiny seed than a large crock. Leave headroom for expansion.
- Mark the starting level. A rubber band or washable marker shows how far the starter rises.
- Use a loose cover while active. The culture releases carbon dioxide. Do not tightly seal an actively fermenting jar in a way that traps pressure.
- Keep the rim clean. Scrape down the inside walls after feeding and wipe the jar exterior to avoid dried starter flakes.
- Use a catch plate. Even a small starter can overflow if the jar is too short or the feeding ratio is too small for the time it sits out.
- Control flour dust. Weigh flour over a tray or directly into the jar, wipe the counter, and keep the starter away from household cleaners and strong odors.
A healthy starter generally has a clean tangy or pleasantly sour aroma. A sharp alcohol-like smell or a layer of liquid can indicate it is hungry; refresh it and assess its activity. If you see colored or fuzzy mold, or pink/orange discoloration, do not try to save it by scraping the surface—discard the culture and thoroughly clean the container. Colorado State University’s starter safety guidance explains these warning signs.
Troubleshooting a tiny no-discard starter
| What you notice | Possible reason | What to do |
|---|---|---|
| Starter rises too fast and collapses | Warm room, small feed ratio, or long wait after peak | Use a larger feed ratio, a cooler location, or refrigerate between bakes. |
| Little rise after feeding | Starter is cold, weak, or not yet mature | Give it time at a suitable room temperature and repeat regular refreshments. Do not judge readiness from bubbles alone. |
| Too sour or solvent-like smell | Starter may be underfed or past peak | Refresh with fresh flour and water; adjust the feeding ratio or interval. |
| Jar overflows | Container too small or starter build too large | Use a taller jar or reduce the build; always leave headroom. |
| Pink, orange or fuzzy growth | Possible contamination | Discard the starter and clean the container thoroughly. Do not bake with it. |
| Recipe needs more starter than you have | Mother starter is intentionally small | Make a separate levain build ahead of mixing; do not permanently enlarge the mother jar. |
Food safety and home micro-baking considerations
Colorado State University Extension advises not tasting raw starter, using clean equipment, keeping the culture covered, and discarding starter that shows colored or fuzzy mold. Read the extension guidance.
If you sell bread from an apartment or home micro-bakery, check the food-business, cottage-food, kitchen, labeling, allergen and local registration rules where you live. These requirements vary by location; a home starter routine does not by itself make a kitchen legally approved for commercial production.
Frequently asked questions
Can I maintain sourdough starter without discarding any?
Yes. Maintain a small seed and use the ripe starter in your dough. The method depends on controlling how much starter you keep and how much you feed it. If you simply keep adding flour and water without using any starter, the jar will keep growing.
What is the best starter size for an apartment?
A 10–20 g seed is a practical starting point for many small-batch bakers. It is easy to scale up for a recipe with a separate levain build. Use a scale because small measurement errors matter more at this size.
What does 1:2:2 mean for sourdough starter?
It means one part existing starter, two parts flour and two parts water by weight. For example, 10 g starter + 20 g flour + 20 g water makes 50 g refreshed starter.
Can I keep sourdough starter in the fridge?
Yes. Refrigeration slows fermentation and can reduce how often you need to feed an established starter. Before baking, allow time for it to warm and become active through one or more room-temperature refreshments or builds.
How do I make enough starter for several loaves without discard?
Keep the mother starter small, then calculate a larger levain build from the amount your dough formula requires plus the amount you want to retain. The calculator in this guide estimates the flour, water and seed amounts.
Can I use a metal lid on my starter jar?
A lid is fine as a cover, but do not clamp or tightly seal an actively fermenting jar if gas cannot escape. Use a loose-fitting lid or other clean, breathable cover while the starter is rising.
Is liquid on top of sourdough starter dangerous?
A liquid layer can form when a starter has gone a while without feeding. It may smell alcoholic. This is different from visible mold or pink/orange discoloration. When in doubt about contamination, discard it rather than taking a risk.
Can I use the same no-discard method for a brand-new starter?
It is better to establish a reliably active starter first. A new culture passes through an early development phase and needs consistent attention. Once it rises predictably after feeding, move to the small-seed routine.
Final thoughts: bake more, waste less
An apartment sourdough routine can be simple: keep a small, healthy seed, feed it in a measured ratio, refrigerate it when you are not baking often, and build only the amount your next batch requires. A no-discard routine is not about avoiding feeding—it is about planning the quantities so your starter becomes bread instead of waste.
For a micro-baker, the small-seed-and-build approach also makes production more predictable. Keep notes on feeding times, room temperature, peak activity and dough performance, then adjust the next build to your kitchen and schedule.
Sources and further reading
- King Arthur Baking — A Smaller Sourdough Starter
- King Arthur Baking — Maintaining Your Starter
- Colorado State University Extension — Sourdough Basics: Caring for Your Starter
- Colorado State University Extension — Sourdough Starter Best Practices and Food Safety
This article is educational. Starter activity and fermentation times vary with flour, hydration, temperature and culture strength. Follow a tested bread recipe and safe food-handling practices.