DIY Olla Clay Pot Irrigation for Balcony Planters: A Step-by-Step, Low-Cost Setup
Keep container plants supplied with water at the root zone using a simple unglazed terracotta pot. This no-plumbing balcony setup turns an ordinary clay pot into a slow-release watering vessel you refill by hand.

1. Why use an olla in a balcony planter?
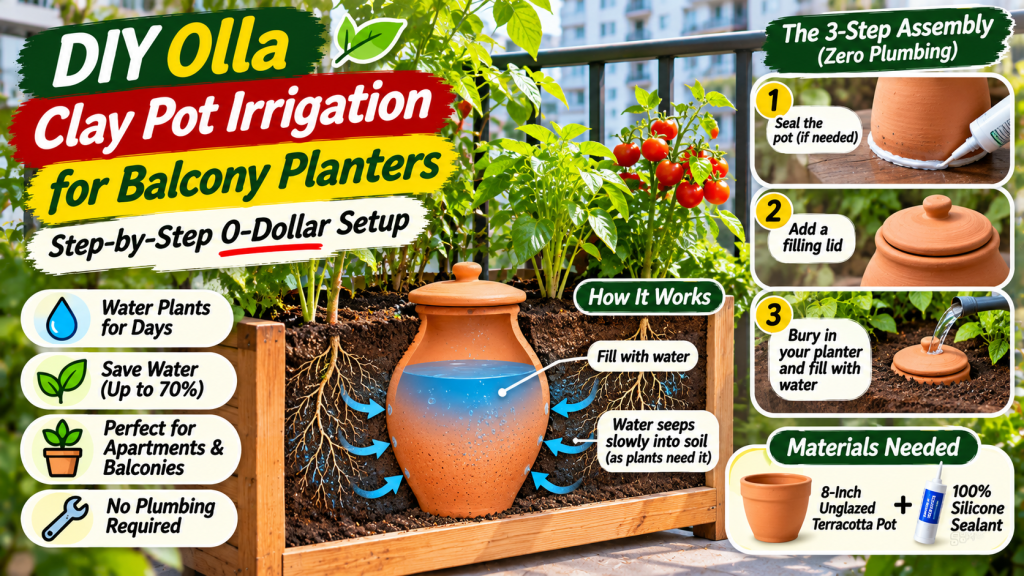
Balcony containers have a small volume of growing mix, so they can dry faster than garden beds—especially in direct sun or wind. An olla stores water inside the planter and releases it through porous clay as the surrounding soil dries. Instead of wetting the entire surface every time, it supplies moisture below the surface near developing roots.
Root-zone watering
Water seeps through the unglazed clay into the surrounding potting mix, helping direct moisture toward roots.
No plumbing or power
Fill it with a jug or watering can. There is no timer, pump, hose connection or electrical supply.
Less surface wetting
Because water is delivered below the surface, the top of the mix can stay relatively drier than with frequent surface watering.
Simple to inspect
Lift the cover and look inside to see whether the reservoir needs a refill.
Ollas are not magic self-watering devices: you still need to check and refill them. Their performance depends on pot size, potting mix, plant roots, sun, wind and temperature. University of California Agriculture and Natural Resources notes that refilling can range from every other day to a week or more depending on conditions. Read its olla guidance.
2. Why traditional drip irrigation can be awkward on apartment railings
Drip irrigation can be very efficient when properly designed. The challenge in some apartments is not the technology itself; it is the installation. A balcony may not have an outdoor tap, a safe route for tubing, or permission to attach equipment to the railing. A poorly secured line can also become messy, kink, leak or send runoff toward a neighbour.
- No nearby tap: A conventional timer-and-tubing setup usually needs a reliable water source and pressure.
- Clogged emitters: Small outlets can clog with sediment or mineral deposits if the water is not filtered or the system is not maintained. The University of Arizona discusses this limitation.
- Railing restrictions: Drilling, clipping or hanging equipment outside a balcony may breach building rules or create a falling-object hazard.
- Runoff: Leaks or excess water can drip onto the balcony below. Use a suitable tray and make sure containers drain safely.
An olla avoids tubing and plumbing, but it is not a replacement for every drip system. It is best for a small number of established plants in containers deep enough to hold the clay vessel. For many tiny pots, shallow window boxes or densely planted trays, hand watering or a properly installed drip line may be easier.
3. Materials: an 8-inch unglazed terracotta pot
This version uses one 8-inch (about 20 cm) unglazed terracotta flowerpot with a drainage hole in the base. It is simpler than joining two pots together and is convenient for a single balcony container. The pot must be plain, porous clay—not glazed, painted, sealed or waterproof-coated.
Main materials
- One 8-inch unglazed terracotta pot
- A small flat ceramic shard or tile piece
- Waterproof silicone specifically labelled suitable for food-contact or potable-water applications
- A matching saucer or small cover for the opening
Basic tools
- Gloves and a clean cloth
- Caulking gun, if required by the sealant tube
- Scissors or a scraper for excess cured sealant
- Watering can or jug
- A stable balcony planter deep enough to bury most of the pot
4. The 3-step assembly: make the olla
Step 1 — Seal the drainage hole
Wash the terracotta pot and let it dry completely. Place a small ceramic shard or tile over the drainage hole on the outside of the base. Apply the specified silicone around the edge of the patch so water cannot escape through the hole. Keep the sealant confined to the hole and patch: do not coat the terracotta walls, because the porous clay is what makes the olla work.
Use gloves and work in a ventilated area. Smooth the bead according to the product instructions. Do not fill or bury the pot while the sealant is still curing.
Step 2 — Allow the sealant to cure fully
Leave the pot in a protected, ventilated place for the full cure time stated on the sealant label or technical data sheet. “Skin dry” is not the same as fully cured. Cure time depends on the product, bead thickness, temperature and humidity; do not assume every silicone is ready after 24 hours.
Do not speed curing with a hair dryer or place the uncured pot near food, children or pets.
Step 3 — Test the plug and check the pot
After the full cure, fill the pot with water and set it over a dry tray. Some moisture spreading through the terracotta walls is expected—that is the irrigation action. What you do not want is a concentrated stream or drip from the sealed drainage hole or around the patch. If the plug leaks, empty and dry the pot, repair the seal and repeat the full cure and test.
Once the base plug is sound, the olla is ready to be installed. Cover the open top with a saucer or fitted lid after filling.
5. Install the olla in a balcony planter
- Choose a deep, stable container. The planter must be deep enough to bury most of the 8-inch pot while leaving its rim accessible. Do not force the olla into a shallow window box.
- Position it near the centre. For a single round planter, placing the olla centrally helps moisture spread around it. Keep it close enough to the plants for roots to reach it, but leave room for the root ball when planting.
- Backfill gently. Add potting mix around the sides and press lightly to remove large air pockets. Good contact between clay and soil is important; air gaps interrupt moisture transfer.
- Leave the opening accessible. Keep roughly 1–2 inches (2.5–5 cm) of the rim above the soil line so you can refill it without soil falling inside. UC Agriculture and Natural Resources recommends leaving this amount exposed.
- Fill and cover. Add water, then place a saucer or fitted lid over the opening to reduce evaporation and keep debris and mosquitoes out.
- Water new plants from above at first. Seeds, seedlings and new transplants may not have roots close enough to the olla. Keep hand-watering until roots establish and the plant responds to the subsurface water source.

6. How much area can an 8-inch olla water?
There is no universal coverage radius. The University of Arizona Extension notes that an 8-inch flowerpot olla may supply moisture across a surrounding area of roughly 16 inches in diameter, but it also emphasizes that ideal spacing research is limited and results depend on soil, crop and climate. Treat this as a starting point for observation—not a guarantee for every balcony planter.
| Planter type | Starting approach | What to monitor |
|---|---|---|
| Small round pot (up to about 12–14 in wide) | One small olla may be more than enough; check moisture before committing to a larger vessel. | Do not let the mix remain constantly saturated. Check the root zone and drainage. |
| Medium pot (around 14–18 in wide) | Try one 8-inch olla near the centre, then observe moisture at several points. | If the outside edge stays dry, supplement with hand-watering or consider another watering method. |
| Long trough or large tub | A single olla may not reach both ends. Use more than one only if there is enough depth and space. | Check moisture at each end; avoid assuming the whole container is evenly watered. |
Potting mixes vary. A coarse, open mix and a dense, fine mix will not distribute water in the same way. Oregon State University Extension notes that container mixes can drain and dry quickly, while University of California guidance recommends ollas mainly for coarse-textured or sandy soils rather than heavy clay-rich mixes. See OSU watering guidance and UC ANR olla tips.
7. Filling and maintenance routine
- Check the water level frequently at first. Start by looking every day or two so you learn how quickly your plants use water.
- Refill before it runs dry. In hot, windy weather, a small container may need more frequent checks than a sheltered planter.
- Keep the lid on. A cover reduces evaporation and helps prevent insects, leaves and potting mix from entering the vessel.
- Check the soil as well as the olla. Feel the mix a short distance from the clay pot. A full olla does not prove that every corner of the container is moist.
- Inspect for cracks and leaks. A sudden change in refill frequency or a visible crack can indicate damage.
- Watch for mineral deposits. Salts can accumulate and clog clay pores over time. Clean the pot gently if flow appears to slow; replace it if it becomes damaged.
Do not use the olla as a reason to ignore plant symptoms. Yellowing leaves, wilting or persistently wet mix can indicate watering or root problems. Adjust the system to the plant and growing medium rather than following a rigid refill calendar.
8. Troubleshooting common balcony olla problems
| Problem | Likely reason | What to do |
|---|---|---|
| Water disappears very quickly | Hot sun, wind, a cracked pot, thirsty established plants or a leaking drain-hole plug. | Inspect the pot and plug; check soil moisture around the planter. Refill more often if the olla is intact and plants are using the water. |
| Soil beside the olla stays dry | Air pockets, poor clay-to-soil contact, dense mix or olla positioned too far from roots. | Gently firm the mix around the vessel, check the potting mix and use supplemental surface watering while plants establish. |
| Plants wilt even when the olla is full | Roots may not have reached the moist zone, the planter may be too large, or the root zone may be too hot or dry elsewhere. | Water from above temporarily, check moisture in multiple locations and reassess olla placement. |
| Water runs out from the base | The drainage-hole patch or seal has failed. | Remove and empty the olla, dry it fully, repair with suitable sealant, allow full curing and retest before reinstalling. |
| Clay surface looks darker or damp | Normal seepage through porous terracotta. | This is expected. Look for a concentrated leak at the plug rather than an evenly damp clay wall. |
| Top opening gets insects or debris | The olla has been left uncovered. | Fit a saucer, stone or lid securely without making it difficult to refill. |
9. Balcony, plant and sealant safety
- Check balcony load limits. Wet potting mix, water and terracotta add weight. Keep the setup on the balcony floor, not hanging outside a railing, and follow building rules.
- Prevent drips to neighbours. Use an appropriate drainage tray and avoid overfilling. Keep balcony drains clear.
- Secure the planter against wind. Tall or lightweight containers can topple in exposed conditions. Do not attach improvised equipment to the outside of the balustrade.
- Use the right sealant. Read the complete technical data sheet. Do not use a product with anti-mould additives for this water-holding vessel unless its manufacturer explicitly approves the intended use.
- Allow full cure before use. Follow label instructions for temperature, ventilation and cure time. Never rely on a generic “24-hour” rule.
- Keep the opening covered. This reduces debris and helps prevent mosquitoes from accessing standing water.
10. Frequently asked questions
Can I make an olla with just one terracotta pot?
Yes. For this guide, a single unglazed pot is used. Seal its drainage hole with a suitable ceramic patch and water-safe sealant, while leaving the porous clay walls uncovered. Another common DIY design joins two matching pots rim-to-rim, with one drain hole left open for filling.
Does the terracotta pot need to be unglazed?
Yes. The porous, unglazed clay walls allow water to seep into the surrounding soil. A glazed, painted or waterproof-coated pot will not work as a conventional olla.
Can I use an 8-inch olla in a balcony planter?
Yes, if the planter is deep enough to bury most of the pot and the plants have room for their roots. Start with one centrally placed olla and observe moisture around the container. Coverage varies with soil, plant and weather.
How often should I refill a DIY olla?
There is no fixed schedule. Check frequently during the first week, then adjust according to how quickly the water level falls and how moist the surrounding mix remains. Hot, sunny or windy balconies can require more frequent checks.
Will an olla water seeds and new seedlings?
Not reliably at first. Their roots may be too small or too far from the vessel. Water from above while seeds germinate and seedlings establish; reduce supplemental watering only when the root zone is consistently receiving enough moisture.
Can I use ordinary bathroom silicone?
Do not assume it is suitable. Some bathroom and construction sealants contain mould inhibitors or other additives. Select a product whose label and technical data explicitly support the intended water-contact use, and follow its full curing instructions.
Can an olla replace drip irrigation?
It can be a simple alternative for selected containers, especially where there is no convenient tap or tubing route. It does not automatically refill itself and may not suit shallow planters, very large troughs or densely planted containers.
Why is water seeping through the sides of my clay pot?
That is how an olla works. Porous terracotta becomes damp as water moves through its walls. A concentrated stream from the sealed drain hole is a leak; a generally damp clay surface is expected.
Grow a more water-wise balcony garden
Explore more practical gardening, composting and zero-waste projects on Before We Sleep.
Visit Before We Sleep- University of Arizona Cooperative Extension — Irrigating with Ollas
- University of California Agriculture and Natural Resources — Olla Irrigation
- Oregon State University Extension — Watering Basics
- ABC Gardening Australia — Olla Watering Pots
- Aqueon — Aquarium Silicone Sealant product information
This is a general DIY gardening guide. Confirm the sealant’s intended use and curing requirements from the product manufacturer. Balcony structures, drainage rules and building restrictions vary.
Visit: rakiyalk.com for more